


Canvas Basics for UNT Faculty
[Last updated: Friday, May 1, 2020, 3:51pm CDT]

Canvas Basics Training
Important Tips for Canvas
- 2. Access Your Course(s)
- Every course, whether F2F, online, or hybrid that has 2 or more students enrolled, is provided with a “Canvas Course.”
- From the unt.edu home page, click on “Canvas,” which can be found at the top right of the page.
- Using your UNT EUID & password, log into Canvas: https://canvas.unt.edu
- When you log in to Canvas, the Dashboard is your landing page. This is where you will find a list of all your courses.

- Click on your Spring 2020 course located on your Dashboard
- This will take you into the “course.” If you have not previously uploaded content into your Canvas Course, you will see “Create a new Module” located in the middle of the page.
- 3. Uploading Course Content
A. Creating a Module
- Click on “Create a new Module,” located in the center of the page or click on the green "+ Module" button on the top right of your screen.
- Give your module a name.
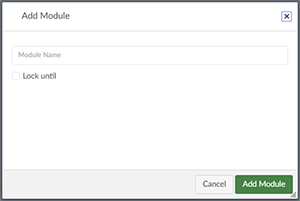
- You can "Lock until" and choose a date when you want the module to open.
- Click "Add Module."
B. Upload a File
You can add an item like PPT Files, Pages, or Assignments directly to a Module. To add a PPT file, for instance:
- Click the “+” button next to the three-dot icon.
- Click on the drop-down next to "Add" and select "File."
- Click on "New File" so that it is highlighted in blue.
- Click on the "Choose File" button that appears.
- Select the File you would like to add to your Module and double click or click “Open.”
- Click the green “Add Item” button, located on the bottom right.
- 5. Quizzes
A. Create a Quiz
Go to "Quizzes" in your course menu.
- Click "+ Quiz" on the top right.
- Select “Classic Quizzes” then submit.
- Under the "Details" tab:
- Give your quiz a name. Otherwise, it will be called "Unnamed Quiz."

- Under "Quiz Instructions," provide quiz instructions for your students.
- Under "Quiz Type," choose a quiz type:
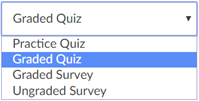
- Practice Quiz (results show points earned in the quiz, but no grade is sent to the grade book)
- Graded Quiz (grades show in the grade book, and there are penalties for incorrect answers)
- Under "Options," you can enable:
- Shuffle Answers (this doesn't shuffle questions; it rearranges answers to each question randomly)
- Time Limit (check the box, then enter minutes in the "Minutes" field)
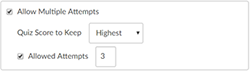
- Allow Multiple Attempts (when you select this option, you can choose which score to keep and specify a limit to multiple attempts)
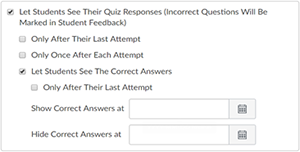
- Let Students See Their Quiz Responses (incorrect questions will be marked in student feedback)
- Only after Their Last Attempt (after a student uses all their attempts, they will be able to see their answers)
- Only Once After Each Attempt (after a student finishes each attempt, they will be able to see their answers)
- Let Students See the Correct Answers
- Show one question at a time (an excellent guard against cheating, as is the "lock questions after answering")
- Under "Assign," choose people you want to assign the quiz to, as well as due and availability dates.
B. Create Quiz Questions
Scroll back up and click on the "Questions" tab, located above the name of your quiz. You have three options for creating quiz questions: create a new question, randomize questions with a question group, and find/pull questions from existing quizzes.

- New Question
- Where you see the word “Question,” assign your question a name.
- Under the "Multiple Choice" drop-down box, select the question type.
- Assign your question a point value in the “pts:” box to the right.
- Under "Question," write (or copy/paste) your question.
- Under "Answers," add your answers and choose the correct answer by clicking on the green arrow that appears when you hover over a “Possible Answer.”
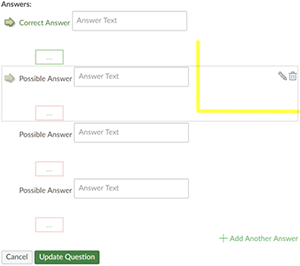
- Click "Update Question" to save the question.
- When your quiz is complete, click “Save” or “Save & Publish.”
C. Moderate a Quiz
For registered ODA or other students who need extra minutes or attempts on a quiz, you can moderate a quiz for those students by:
- From the Quizzes menu, select the name of the “Published” quiz you wish to moderate.
- Under "Related Items" on the top right, click "Moderate This Quiz".
(You can select multiple students to moderate, or you can click the pencil icon to the far right of a student’s name.) - In the "Student Extensions" window that pops up, give the student(s) extra time and attempts as you see fit. These extensions are in addition to what the student already has.
- If the student has used up all of their attempts on the quiz, check the box for "Manually unlock the quiz for the next attempt."
- Click "Save."
Any moderations you have made will be shown in the student's row.
- 6. Announcements
Announcements are a perfect way to communicate quickly with students. They can be sent to any combination of sections within your course, but they cannot be posted to multiple courses at once.
A. Create an Announcement
- Click "Announcements" on your course menu.
- Click "+ Announcement" at the top right of your screen and give your announcement a title.
- Under "Post to," choose which sections to which you want to post the announcement.
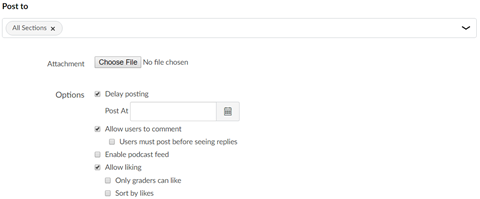
- Under "Attachment," you can attach files to an announcement.
- Under "Options," you can:
- Delay posting (and choose a post date)
- Allow users to comment (and require users to post before seeing replies)
- Click "Save"
B. Display Announcements on Front Page
- Navigate to your course.
- From the Course Navigation Bar, click “Settings.”
- Under the "Course Details" tab, scroll down and click on the "more options" link at the bottom of the page.
- Check the "Show recent announcements on Course home page" box.
- Click “Update Course Details” at the bottom of the page to save.
- 8. LockDown Browser/Monitor:
If you have already created a quiz or exam in Canvas, you can use the following steps to enable LockDown Browser/Respondus Monitor. LockDown Browser disables the student’s ability to print, copy, access other applications or go to another URL. Respondus Monitor uses a webcam feature that records students while they are taking the exam. Faculty are welcome to use LockDown Browser as an individual tool or use it in conjunction with Respondus Monitor for student exams.
- If you want to use LockDown Browser only within your Canvas course, click on the LockDown Browser link on the Course Navigation menu.
- Click on the grey drop-down button to the left of the assessment name. Select "Settings," then select "Require Respondus LockDown Browser for this exam."

- If you wish to use LockDown Browser with Respondus Monitor, select "Require Respondus Monitor for this exam" under "Monitor Webcam Settings."
- Click the blue Save + Close button.
Canvas Boot Camp Course
All faculty are enrolled in the Canvas Boot Camp course.
Click to Take Canvas Boot Camp CourseCanvas Instructor Guide
Click to View Canvas Instructor GuideOverview Video
For an overview of Canvas features, the Canvas Community has created an overview video: